Showing posts with label on. Show all posts
Showing posts with label on. Show all posts
Sunday, February 23, 2014
On a MCM kick!
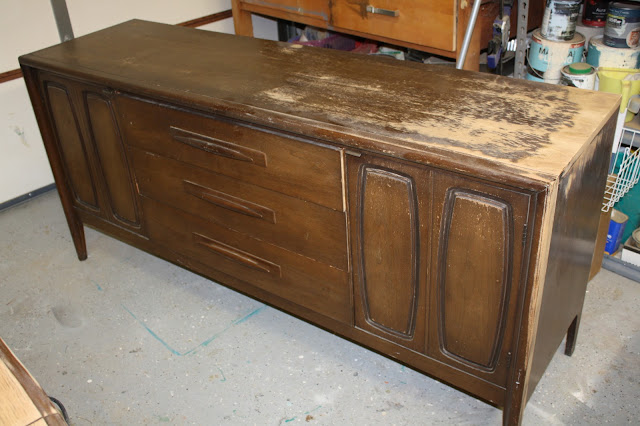
I picked up another credenza for a heck of a deal! This was made my Broyhill in the early 60s.
The guy had been keeping it outside and had no idea what he had.
This was located in a seedy part of town. So I took my pit-bull and a little something extra
for protection ;) (Im allowed to do that btw!)
There are so many on craigslist in the natural state, albeit refinished. They look great! But
they dont seem to sell that fast. I find that people like the ones that are painted.
Since this wasnt in pristine shape, I didnt feel so bad painting it.


I redid the drawers as well. Everything was a walnut veneer. Remember with veneers, go easy
when you sand, lest you hog all the veneer off!! Ask me how I know this......

I love how the wood came out! This is a very masculine looking piece, quite
different from what I usually do.


Linking up at these great parties:
Restore Interiors - Restored it Wednesday
Kammys Korner - Trash to Treasure Tuesdays
Domestically Speaking - The Power of Paint Party
The Shabby Creek Cottage - Transformation Thursday
Miss Mustardseed - Furniture Feature Friday
Redoux - Friday Link Up Party
Homespun Happenings - Rustic Restorations Weekend
Funky Junk Interiors - Saturday Night Special
1929 Charmer - Sundays Best Party
Knick of Time Interiors - Knick of Time Tuesday
Elizabeth and Co., My uncommon Slice of Suburbia,
Savvy Southern Style. Weds, Beyond the Picket Fence, PJH Designs
From my Front Porch to Yours,
Between Naps on the Porch, Catch as Catch Can , The Dedicated House, Redoux

Tuesday, February 11, 2014
Progress on the Half Rounds
 Will and I are making some progress on the half round tables. Hes not yet made any of these from start to finish and I havent made one personally for quite a long time so were both kind of feeling our way here through whats next and how to go about it. Click the pictures to enlarge them...These posts will be helpful next time ...
 Trevor routed a full size template in mdf from our cad drawing and we placed the male section of our glue up forms on the template on the inside of the apron curves. We than struck our angles on the form in pencil and moved the forms to the chop saw where we cut the angles on the bordered aprons.
 Next we used parts of the female glue up forms to set up the multirouter to cut the mortises for the loose tenons we use for the joinery. The loose tenons allow us to adjust our angles slightly if necessary for the final fit up.
 We clamped the back legs and then checked the fits. next step was to stain and paint and move those parts to the finish room before the final glue up. You can see the haunched loose tenons in the photo below.

 While those parts were being finished, Will cut and glued up the pieces to make the inlay blocks (the very last photo in that post) in the drawing above. They were ripped on the tablesaw on an 8 degree angle, cut to length and glued up in the simple jig below.
 After the center block was sanding to 3/8ths, Will added the 1/1th" plus shop made walnut veneers for the top and bottom and glued them on in the veneer bag.
 The finished inlay blanks are below. theyl be sliced into 1/16th inch strips and inset in to a routed groove sometime in the next post.

 We got a nice wide plank from Irion Lumber to make the 20" wide one piece tops and Trevor cut them to shape on the cnc. Hopefully our nex inlay bit will come tomorrow and we can inlay the tops, but in the meantime, will will dovetail the drawers and fit up the drawer fronts .. All for now .. Thanks for sticking with me ...
Monday, February 10, 2014
Slow Progress on the Candle Rack
Every fall I think the start of the school year has got to be the craziest time of the year. And every spring I change my mind. Hands down, the end of the school year is the craziest time. It seems like every minute has at least an hours worth of work to get done.
So after spending four hours of a beautiful Sunday in my stuffy classroom (the air circulation is shut off on weekends), I came home and hid in the shop for about an hour. It wasnt much, but I did make some progress on the candle rack.
First, I had to remember what I was working on - finishing the dovetails. Then I had to double check that I was working with the right parts in the right orientation. All stuff that just takes care of itself when you arent breaking your project up into tiny amounts of time spread over weeks.
I did the layout on the tops of the sides by eye. If you look closely, you can see that I changed my mind a couple of times:

After cutting the tails, I transferred the layout to the pin board, cut it out and what do you know? It went together the first time:

It was fun to see the case for the rack coming together:

Not much progress, but better than nothing. And a nice hour in the shop with something to show for it is never bad. Actually, an hour in the shop is never bad, whether there is something to show for it or not.
Thursday, January 23, 2014
Subscribe to:
Posts (Atom)